what are you looking for?

This article refers to the industry standard QC/T 844-2011 and lists in detail the key performance requirements of the automotive seat recliner. Engineers in the seat industry can learn about it and refer to these contents when compiling DVP.
1) Front and rear clearance of the recliner
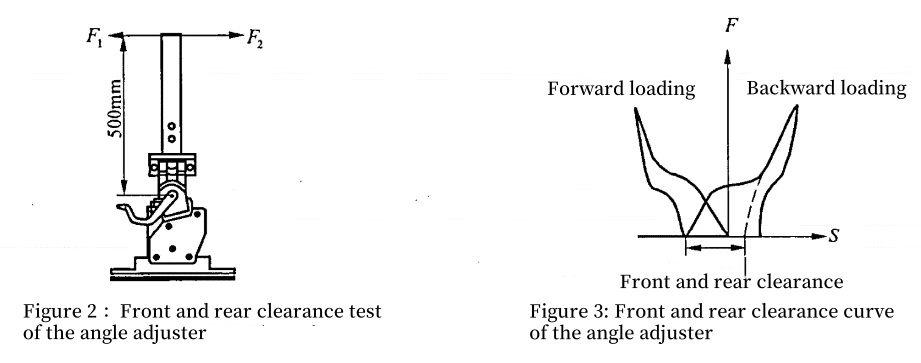
Fix the recliner assembly on the rigid fixture according to Figure 2, weld a rigid steel plate on the upper connecting plate, and evenly apply a forward force F1=200N perpendicular to the backrest at 500mm from the rotation center, and then release it evenly; then evenly apply a horizontal backward force F2=200N, and then release it evenly to obtain the F-S curve. According to Figure 3, draw a tangent along the upper part of the backward loading curve. The distance between the intersection with the S axis and the starting point of the backward loading is the front and rear clearance of the recliner. The front and rear clearance of the recliner should not be greater than 3.5mm.
2) Lateral clearance of the recliner
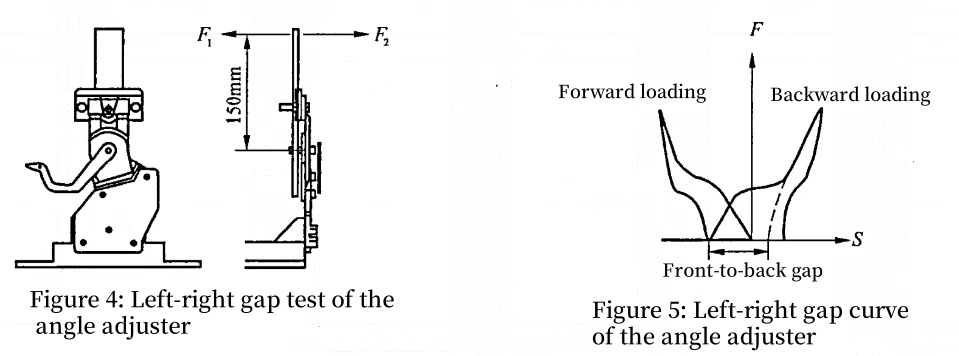
Fix the recliner assembly on a rigid fixture according to Figure 4, weld a rigid steel plate on the upper connecting plate, apply a force F1=100N perpendicular to the backrest to the left at a distance of 150mm from the rotation center, and then release it evenly; then apply a horizontal force F2=100N to the right evenly, and then release it evenly to obtain the F-S curve. Draw a tangent along the upper part of the right-hand loading curve according to Figure 5. The distance between the intersection with the S axis and the starting point of the right-hand loading is the lateral clearance of the recliner. The lateral clearance of the recliner should not be greater than 1.5mm.
3) Manual recliner sliding gear speed
Fix a simulated backrest frame assembly with an idle stroke recliner on a rigid fixture, place the simulated backrest in the front position, and lift the simulated backrest upward to ensure that the angular velocity of the simulated backrest is 180°/s when it reaches the first meshing position. The test result should be able to lock at the first tooth position.
4) Manual recliner operating force

a. Discontinuous manual recliner
Fix a complete discontinuous manual recliner simulating the backrest assembly on a rigid fixture. According to Figure 6, at 20mm from the end of the handle, use a dynamometer to pull the handle in the unlocking direction vertically. The dynamometer reading when the backrest is just unlocked is the unlocking force, and the unlocking force range should meet 19.6N~80N.
b.Continuous manual recliner
Fix a complete continuous manual recliner simulating the backrest assembly on a rigid fixture. Use a torque wrench to drive the handwheel at a uniform speed. The reading of the torque wrench is the operating torque. The test results of the simulated backrest assembly in any position and under no-load conditions should meet 1 Nm~3Nm.
5) Manual recliner handle misoperation force
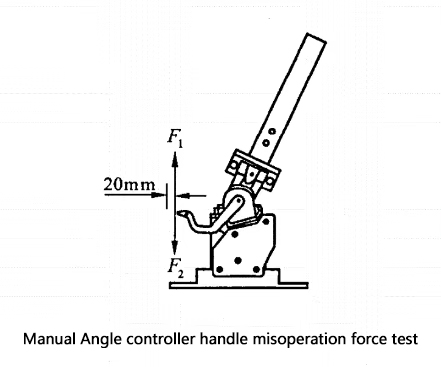
Fix a simulated backrest frame assembly on a rigid fixture according to Figure 7, lift the handle upward, add the lifting force to 200N and hold it for 5s. After releasing the force, the recliner is required to function normally. According to Figure 7, a simulated backrest frame assembly is fixed on a rigid fixture, and the handle is pressed down to increase the downward pressure to 300N and maintained for 5s. After releasing the force, the recliner is required to function normally.
6) Recliner forward and backward static load strength
a. Recliner forward static load strength
A recliner assembly is fixed on a rigid fixture, and a rigid steel plate not shorter than 300mm is welded on the upper connecting plate. A forward pulling force is applied to the upper end to ensure that the torque generated by the pulling force is 600N·m, and it is maintained for 5s without abnormal phenomena such as breakage and excessive deformation. (If the upper plate is twisted during loading, an auxiliary hinge can be added to improve the stability of the test)
b. Recliner backward static load strength
A recliner assembly is fixed on a rigid fixture, and a rigid steel plate not shorter than 300mm is welded on the upper connecting plate. A backward pulling force is applied to the upper end to ensure that the torque generated by the pulling force is 800N·m, and it is maintained for 5s without abnormal phenomena such as breakage and excessive deformation. (If the upper plate is twisted during loading, an auxiliary hinge can be added to improve the stability of the test)
7) Impact strength of the recliner
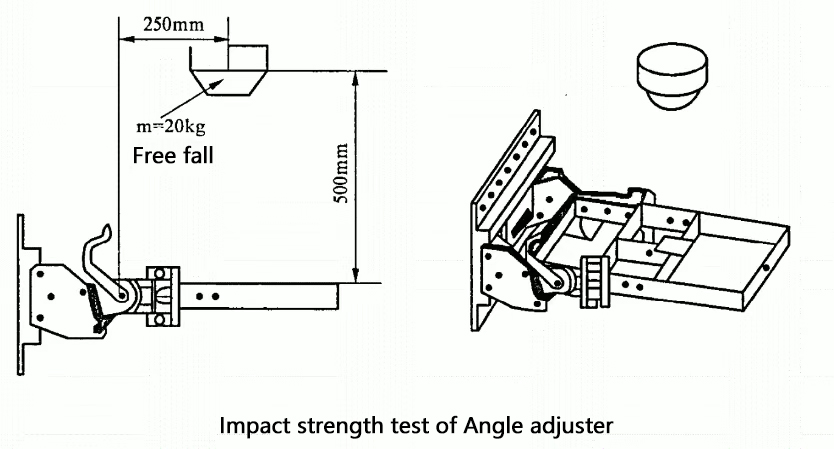
Fix a simulated backrest frame assembly on a rigid fixture according to Figure 8, and let a 20kg weight fall freely from a height of 500mm. The impact position is at the center of the backrest 250mm away from the rotation center. It is required that there is no abnormal phenomenon such as breakage or excessive deformation after the impact.
8) Front and rear limit strength of the recliner
Fix a simulated backrest frame assembly on a rigid fixture, adjust the simulated backrest to the front or rear position and keep the recliner unlocked, apply a torque of 245N·m forward and backward respectively, and keep it for 5s without abnormal phenomena such as breakage or excessive deformation.
9) Durability of alternating load of recliner
A simulated backrest frame assembly is fixed on a rigid fixture, and the simulated backrest frame is adjusted to the designed position. Alternating loads of forward torque F1 = 147N·m and backward torque F2 = 294N·m are applied to the middle of the simulated backrest upper rod in sequence. Each time the forward and backward loading is completed is a cycle. After a total of 15,000 cycles, the angle change of the upper connecting plate should not exceed 1.5°, and the entire recliner assembly has no abnormal phenomena such as breakage, excessive deformation and functional failure.
10) Durability of manual recliner operation
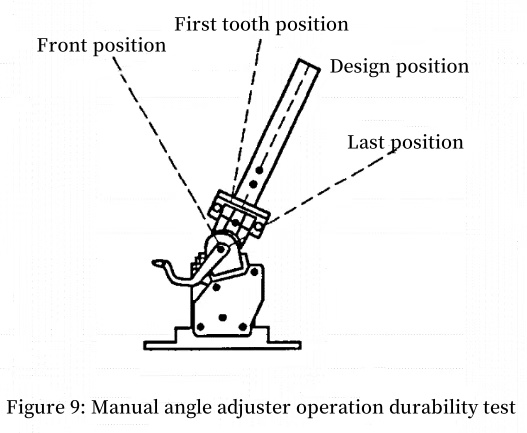
Fix a simulated backrest frame assembly on a rigid fixture according to Figure 9, adjust the simulated backrest frame to the first tooth position, and follow the first tooth position → last position → design position → front position → first tooth position as a cycle. Each position must have locking and unlocking steps. After completing 8,000 cycles, the recliner assembly should function normally without obvious deformation and mechanical damage. The flat scroll spring return torque attenuation rate should not exceed 15%, the recliner operating force change should be within 15%, the front and rear clearance of the recliner should be less than 3.85mm, and the lateral clearance should be less than 1.65mm.
For the simulated backrest frame assembly of the recliner without idle travel, there is no first tooth position. Follow the design position → last position → front position → design position as a cycle, and the rest of the process is the same.
11) High and low temperature performance of the recliner
a. Place the recliner assembly in an environmental test chamber, adjust the ambient temperature in the chamber to -40℃ and +80℃ respectively, keep the temperature for 4 hours, and then place the recliner assembly to room temperature. The recliner assembly should have no abnormal phenomenon.
b. Place the recliner assembly in an environmental test chamber, adjust the ambient temperature in the chamber to -29℃ and +70℃ respectively, keep the temperature for 4 hours respectively, and operate the recliner in the corresponding environment. The recliner assembly can complete at least one working cycle without grease dripping.
c. Place the recliner assembly in an environmental test chamber, adjust the ambient temperature in the chamber to -29℃ and +70℃ respectively, keep the temperature for 4 hours respectively, and then adjust the chamber temperature to room temperature. Operate the recliner. The running speed change of the recliner assembly should be less than 25%, and the running noise increment should be less than 3dB(A).
12) Lateral stiffness and clearance of the unlocking handle of the manual recliner
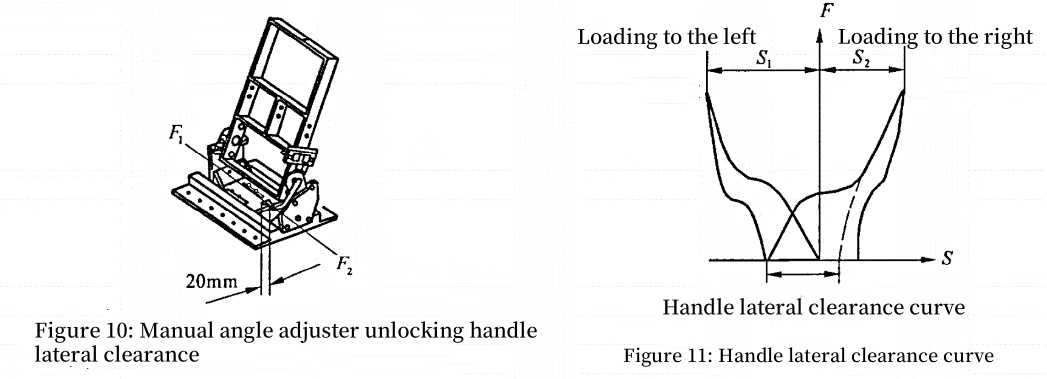
Fix a simulated backrest assembly on a rigid fixture according to Figure 10, and apply a horizontal force F1=49N to the left at 20mm from the end of the handle, and then release it evenly; then apply a horizontal force F2=49N to the right, and then release it evenly to obtain the F-S curve. The maximum deformations are S1 and S2 respectively. Draw a tangent along the upper part of the rightward loading curve according to Figure 11. The distance between the intersection with the S axis and the starting point of the rightward loading is the lateral clearance of the handle. The total deformation S=S1+S2 should not be greater than 15mm. If only one side is forced, the deformation S1 or S2 should not be greater than 10mm, and the lateral clearance of the handle should not be greater than 2mm.
13) Maximum angular displacement of the unlocking handle of the manual recliner
Fix the recliner assembly with a handle on a rigid fixture, and use an inclinometer to measure the angular displacement of the handle from the initial position to the maximum unlocking position. The maximum angular displacement should not exceed 40°.
14) Running speed of the electric recliner
Fix the simulated backrest assembly with the electric recliner on a rigid fixture, add a 45kg weight at a distance of 245mm from the rotation center, test the voltage to 12.6V (coil resistance is not greater than 0.2Ω), use a stopwatch to measure the time t1 taken by the backrest to move from the last position to the front position, and then measure the time t2 taken by the front position to move to the last position. The recliner stroke divided by the obtained time t1 and t2 is the running speed ω1 and ω2 of the electric recliner. Within the entire adjustment stroke, the running speeds ω1 and ω2 of the electric recliner should meet 2°/s ~ 6°/s.
15) Electric recliner vibration
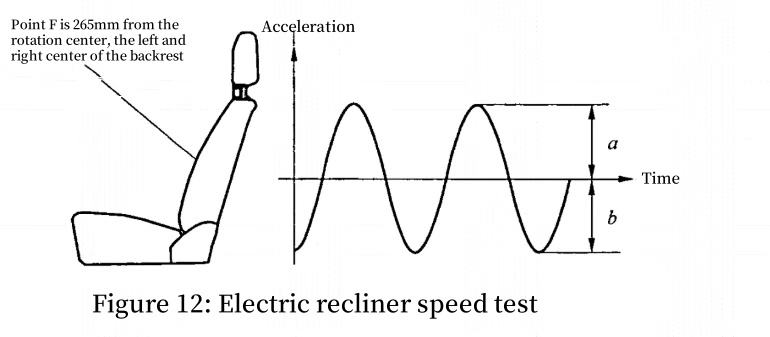
Fix a complete seat on a rigid fixture according to Figure 12, fix a 30×30×1mm small steel plate at point F, fix an acceleration sensor on the small steel plate (range: 0~500Hz), voltage 12.6V (coil resistance not more than 0.2Ω), adjust the recliner, within the adjustment range, the vibration acceleration ((a+b)/s ) should not be greater than 5.88m/s^2.
16) Electric recliner noise
Fix a complete seat on a rigid fixture, add a 45kg weight at 245mm from the rotation center, test voltage 12.6V, place a decibel meter on the center plane of the seat 635mm above point H and 100mm behind the seat, adjust the seat when the ambient noise is below 35dB(A), and the noise should not be greater than 53dB(A) during the entire movement range.
17) Operational durability of electric recliner
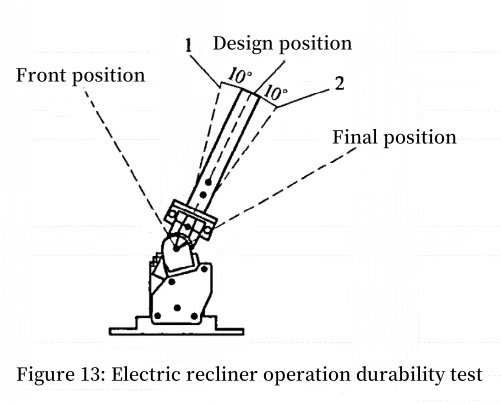
Fix an electric recliner simulation frame assembly on a rigid fixture according to Figure 13, add a 45kg weight at a distance of 245mm from the rotation center, adjust the simulated backrest frame to the designed position, test voltage 12.6±0.5V, repeat the test with one full stroke and three partial strokes as one cycle, and complete a total of 2,000 cycles (full stroke is: designed position → last position → front position → designed position; partial stroke is: designed position → 2 → 1 → designed position, and the electrical appliance is allowed to be sufficiently cooled during the test), there should be no obvious deformation and mechanical damage, the front and rear clearance of the recliner should be no more than 3.85mm, and the lateral clearance should be no more than 1.65mm.
18) Overload protection of electric recliner assembly
As shown in Figure 13, fix an electric recliner simulation skeleton assembly on a rigid fixture, add a 45kg weight at a distance of 245mm from the rotation center, operate the recliner to the front and rear positions at a voltage of 14.5V, and no abnormality occurs in the recliner assembly.
Under a voltage of 12V, the recliner assembly should be able to start running from the front and rear limit positions. After adjusting the recliner to the front and rear limit positions respectively, continue to energize the recliner assembly to overload it, record the time from the start of overload to the occurrence of power-off protection, and the test results should meet the following requirements.
The electric recliner assembly runs to the limit position at a voltage of 14.5V, and no abnormality occurs in the recliner assembly. Under a voltage of 12V, the recliner assembly should be able to start running from the limit position. When the recliner assembly is overloaded, there should be overload protection, and the time from overload to power-off protection should not exceed 20s.
 +86 19906048932
 sales@luxuryvanseat.com


 | Blog
| Sitemap
| XML
| Privacy Policy
| Blog
| Sitemap
| XML
| Privacy Policy